JumpCloud Single-Sign-on Setup
The following describes how to set up Single-Sign-on in dbFront using JumpCloud (JumpCloud.com).
JumpCloud offers a fully functional 10 users & 10 systems Free Forever license which is ideal for small organizations or IT departments that are experimenting with Single-Sign-on.
Information Collection
When setting up JumpCloud Single-Sign-on you need to collect or decide on the following pieces of information:
- Determine a display name for your application. e.g. "dbFront - Records Maintenance"
- Determine the root URL for your dbFront install. This would be something like:
- https://dbFront.YourCompany.com/dbFront/ (public server with SSL)
- http://YourServer/dbFront/ (internal server without SSL)
- Create a unique application id: A suggested value is "sp.dbFront.YourCompany.com"
- Determine / Create a JumpCloud group for administrators: e.g. "dbFrontAdmins"
JumpCloud Application Setup Steps
- Browse to the JumpCloud login page: https://console.jumpcloud.com/login
- Click on Administrative Login at the top left of the screen,
- The login screen should now say JumpCloud Administrator Login,
- Complete the login,
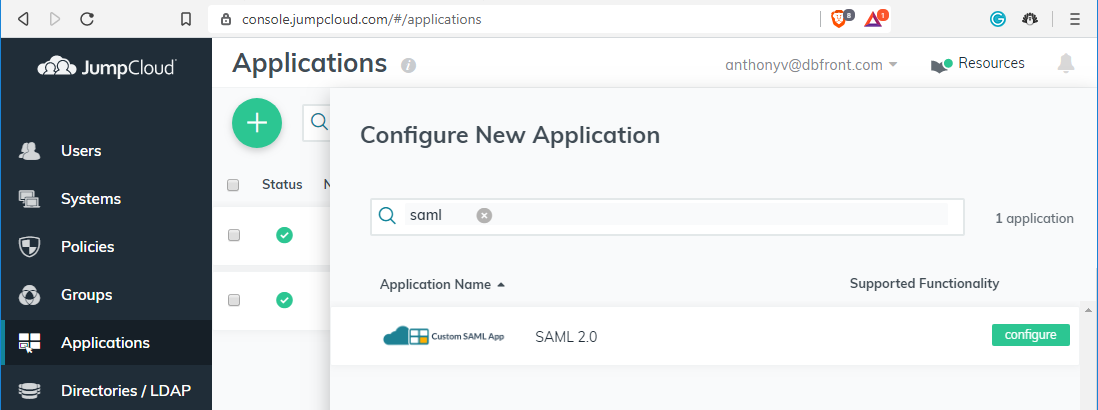
- Click on the Application link on the left side menu to view the configured applications,
- Click on the big green plus symbol to configure a new application,
- A dialog should appear prompting you to search for a known application,
- Search for "SAML" which should filter the list to "Custom SAML App / SAML 2.0"
- Click on the green configure button to set up your new dbFront application,
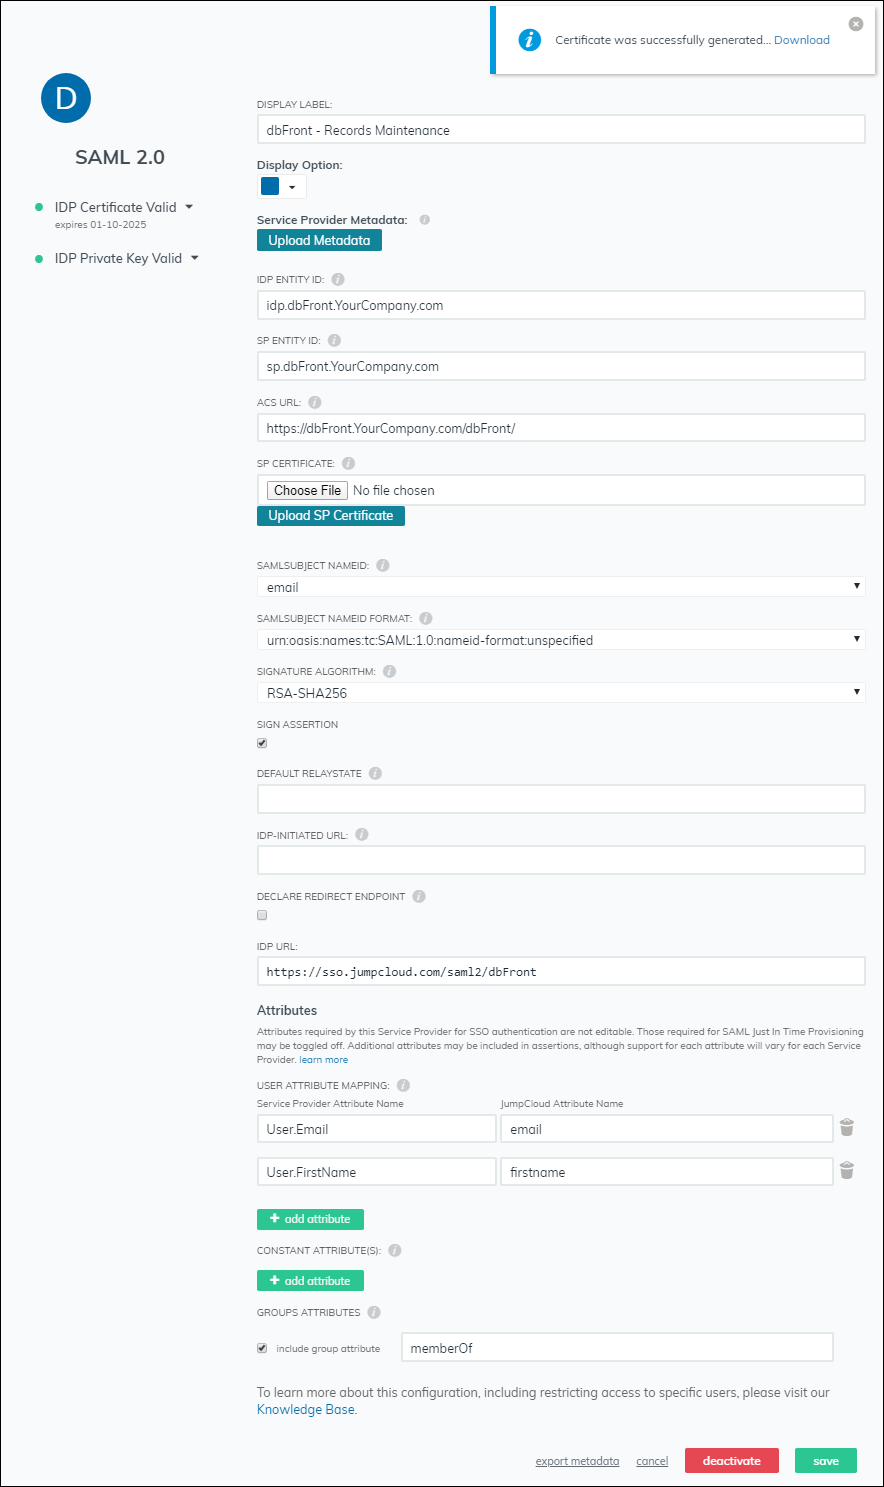
- Adjust the following settings:

- Display Label: e.g. "dbFront - Records Maintenance"
- IDP Entity Id: This is a JumpCloud internal unique value for your application. A suggested value is: "idp.dbFront.YourCompany.com"
- SP Entity Id: This value must match the dbFront Application Id configured in dbFront, the value suggested above was "sp.dbFront.YourCompany.com",
- ACS URL: This should match the root URL for your dbFront install, e.g. "https://dbFront.YourCompany.com/dbFront/",
- SP Certificate: Leave blank, not yet supported,
- Sign Assertion: Check value,
- IDP URL: Set to https://sso.jumpcloud.com/saml2/dbFront. This value must match the JumpCloud Endpoint Url configured in dbFront,
- Attributes: Ensure that the JumpCloud "email" and "firstname" attributes are included as "User.Email" and "User.FirstName",
- Groups Attributes: Ensure that the group attribute is included with the name "memberOf"
- Click activate to save the application settings,
- After clicking confirm JumpCloud will create and activate the application and generate a Public Certificate,
- Download the Public Certificate from the popup notification or by re-entering the application settings.
JumpCloud Groups and Users
Please review the JumpCloud documentation for instructions on creating and assigning users and groups to the dbFront application.
dbFront Application Setup Steps
Once the application is set up in JumpCloud, you can then proceed with the setup in dbFront.
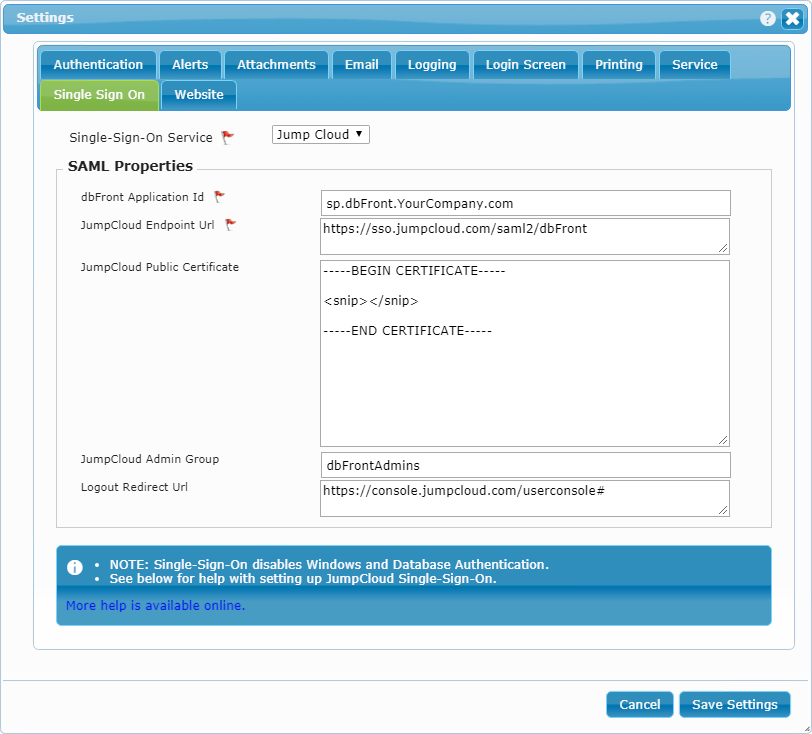
The JumpCloud specific instructions are:
- Single-Sign-On Service: Jump Cloud,
- dbFront Application Id: sp.dbFront.YourCompany.com,
- JumpCloud Endpoint Url: https://sso.jumpcloud.com/saml2/dbFront,
- JumpCloud Public Certificate: Open the downloaded certificate as a text file and copy the complete text into this field,
- JumpCloud Admin Group: Enter the name of the JumpCloud admin group that should have Admin access to dbFront,
- Logout Redirect Url: Enter "https://console.jumpcloud.com/userconsole#"
This special URL will allow users who log out of dbFront to return to the JumpCloud menu where they can either log-out completely or start another application.
For complete instructions on completing the dbFront Single-Sign-on setup see: Single-Sign-on
Trouble Shooting
For a list of Single-Sign-On issues and answers see: Single-Sign-On Questions


